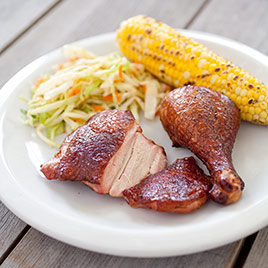
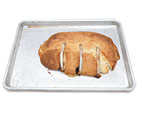
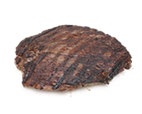
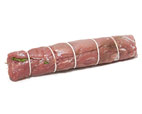
Smoked Chicken
Avoid mesquite wood chunks for this recipe: we
find that the meat can turn bitter if they smolder too long. When using a
charcoal grill, we prefer wood chunks to wood chips wheneer possible.
If using a gas grill, you will need to use wood chips.
Ingredients
- 1cup salt
- 1cup sugar
- 6pounds bone-in chicken parts (breasts, thighs, and drumsticks), trimmed
- 3tablespoons vegetable oil
- Pepper
- Large disposable Aluminum roasting pan (if using charcoal) or disposable aluminum pie plate (if using gas)
- 2 wood chunks soaked in water for 30 minutes and drained (if using charcoal) or 3 cups wood chips, half of chips soaked in water for 30 minutes and drained (if using gas)
Instructions
- 1. Dissolve salt and sugar in 4 quarts cold water in large container. Submerge chicken in brine, cover, and refrigerate for 30 minutes to 1 hour. Remove chicken from brine and pat dry with paper towels. Brush both sides of chicken with oil and season with pepper.
- 2a. For a Charcoal Grill: Open bottom vent halfway. Arrange disposable pan filled with 2 cups water on 1 side of grill and 2 quarts unlit charcoal briquettes against empty side of grill. Light large chimney starter filled halfway with charcoal briquettes (3 quarts). When top coals are partially covered with ash, pour on top of unlit briquettes, keeping coals steeply banked against side of grill. Place wood chunks on top of coals. Set cooking grate in place, cover, and open lid vent halfway. Heat grill until hot and wood chunks begin to smoke, about 5 minutes.
- 2b. For a Gas Grill: Use large piece of heavy-duty aluminum foil to wrap soaked chips into foil packet and cut several vent holes in top. Wrap unsoaked chips in second foil packet and cut several vent holes in top. Place wood chip packets directly on primary burner. Place disposable pie plate with 2 cups water on other burner(s). Turn all burners to high, cover, and heat grill until hot and wood chips begin to smoke, about 15 minutes. Turn primary burner to medium-high and turn off other burner(s).
- 3. Clean and oil cooking grate. Place chicken, skin side up, as far away from fire as possible with thighs closest to fire and breasts furthest away. Cover (positioning lid vent over chicken if using charcoal) and cook until breasts register 160 degrees and thighs/drumsticks register 175 degrees, 1 1/4 to 1 1/2 hours.
- 4. Transfer chicken to cutting board, tent loosely with foil, and let rest for 5 to 10 minutes before serving.
Technique
Technique
-
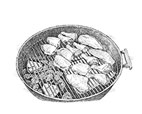
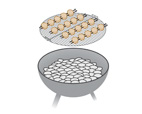
Smoking Chicken in a Charcoal Kettle
To produce tender, juicy, smoky chicken, we devised a three-part fire setup in our charcoal kettle. It mimics the slow, steady, indirect heat that pit masters get from a dedicated smoker, plus it avoids sooty flavors.
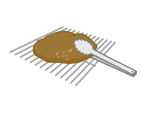
TWO QUARTS OF UNLIT COALS
Bank to one side of the grill with 3 quarts of lit coals piled on top to keep the fire going without it being necessary to open the lid.
A WATER PAN
Place underneath the grill grate opposite the coals to create steam, which helps stabilize the temperature and keep the meat moist.
TWO SOAKED WOOD CHUNKS
Place on top of the coals smoldered for about 45 minutes—just long enough to infuse the chicken with smoky (not sooty) flavor.
-
-
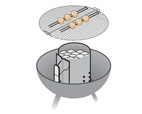
Don't Oversmoke Your Chicken
To infuse our chicken pieces with full-bodied smoke flavor, we figured it was necessary to keep the wood chunks smoldering for the entire time that the meat was on the grill. But when the finished product tasted not just smoky, but also harsh and ashy, we wondered: Was there a limit to the amount of smoke that the chicken could take?
Experiment
We smoked two batches of chicken. For the first, we added two soaked wood chunks to the fire at the beginning of cooking; when those had burned out about 45 minutes later, we added two more soaked chunks to keep the smoldering going for the duration of cooking. For the second batch, we didn’t replenish the wood after the initial chunks had burned out.
Results
The chicken exposed to smoke the entire time tasted bitter and sooty, while the pieces that were exposed to smoke for only 45 minutes or so (about half of the overall cooking time) had just enough smoky depth.
Explantion
Smoke contains both water- and fat-soluble compounds. As the chicken cooks, water evaporates and fat drips away, eventually halting meat’s capacity to continue absorbing smoke flavor. Once that happens, any additional smoke flavor that’s not absorbed by the meat gets deposited on the exterior of the chicken, where the heat of the grill breaks it down into harsher—flavored compounds.
-
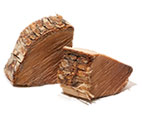 One round of wood chunks = Balanced smoki
===================================
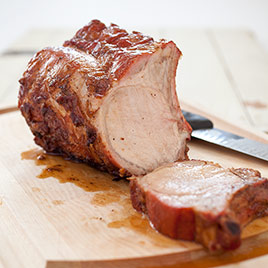
Grilled Bone-In Pork Roast
If you buy a blade-end roast (sometimes called a
“rib-end”), tie it into a uniform shape with kitchen twine at 1-inch
intervals; this step is unnecessary with a center-cut roast. For easier
carving, ask the butcher to remove the tip of the chine bone and to cut
the remainder of the chine bone between the ribs. For instructions on
carving the roast, see step-by-step below.
Ingredients
- 1(4- to 5-pound) center-cut rib or blade-end bone-in pork roast, tip of chine bone removed
- 4teaspoons kosher salt
- 2cups soaked wood chips, or 1 (3-inch) wood chunk
- 1 1/2teaspoons ground black pepper
- 1 recipe Orange Salsa with Cuban Flavors, optional (see related recipe)
Instructions
- 1. Pat roast dry with paper towels. If
necessary, trim thick spots of surface fat layer to about ¼-inch
thickness. Using sharp knife, cut slits in surface fat layer, spaced 1
inch apart, in crosshatch pattern, being careful not to cut into meat.
Sprinkle roast evenly with salt. Wrap with plastic wrap and refrigerate
for at least 6 hours, up to 24 hours.
- 2a. FOR A CHARCOAL GRILL: One
to 2 hours before grilling, submerge wood chips in bowl of water to
soak. Light large chimney starter filled with charcoal (6 quarts, about
100 briquettes). When top coals are partially covered with ash, pour
coals into grill and cover one-third of grill. Place wood chunk on top
of coals, set cooking grate in place, cover, and heat until grate is hot
and wood is smoking, about 5 minutes.
- 2b. FOR A GAS GRILL: Place
soaked chips in 9-inch disposable aluminum pie plate and set on primary
burner of grill (burner that will stay on during grilling). Set cooking
grate in place. Turn all burners to high and heat grill with lid down
until very hot, about 15 minutes. Turn primary burner to medium-high and
turn off other burner(s).
- 3. Place soaked chips in 9-inch disposable
aluminum pie plate and set on primary burner of grill (burner that will
stay on during grilling). Position cooking grates over burners. Turn all
burners to high and heat grill with lid down until very hot, about 15
minutes. Turn primary burner to medium-high and turn off other
burner(s). Scrape grate clean with grill brush.
- 4. Sprinkle roast evenly with pepper. Place
roast on grate with meat near, but not over, primary burner and bones
facing away from heat. Open top vents halfway and cover grill,
positioning vents over meat. (Initial grill temperature should be about
425 degrees.) Grill roast until instant-read thermometer inserted into
thickest part of meat registers 140 degrees, 1¼ to 1½ hours.
- 5. Transfer roast to carving board, tent loosely with foil, and let rest for 30 minutes (internal temperature should rise to about 150 degrees). Carve into thick slices by cutting between ribs. Serve, passing salsa separately (if using).
Technique
-
The Best Bone-In Pork Roast
The three most common pork loin roasts offer markedly different results in terms of flavor and texture.
TOP-CHOICE: Center-Cut Rib Roast
A cut from the center of the loin that contains mostly loin muscle (and sometimes a bit of tenderloin) attached to a neat row of curved rib bones.
Pros: Good flavor; easy availability; no tying necessary
Cons: None when cooked bone-in; tendency to dry out when boneless
CLOSE SECOND: Blade-End Roast
Also knows as the "rib-end roast," this cut from the shoulder end of the loin is a hodgepodge of small muscles.
Pros: Exceptionally rich flavor
Cons: Spotty availability; must be tied; tricky to slice cleanly
DISTANT THIRD: Center-Cut Loin Roast
A narrow section of loin muscle fused with a larger section of tenderloin, cut from the rear of the loin. The bones are mostly T-shaped vertebrae, not ribs.
Pros: Tender, decent flavor
Cons: Bone structure makes carving difficult; less flavorful than other options
Technique
-
The Weirdest Roast Ever
We've long known that the fat and connective tissue that surround bones lend moisture and richness to bone-in meats, while the mere presence of bones slows cooking and limits evaporation of juices. But it seemed to us that there must be other reasons why bone-in meat tastes better than the boneless kind. So when two meat experts suggested that some flavor might migrate from the rich marrow at the center of bones through the porous bone itself and right into the meat, our curiosity was piqued. We devised a test to see if this theory made any sense.
EXPERIMENT
To fabricate a neutral-flavored pork substitute, we made a big batch of mashed potatoes and seasoned it with 8 percent butter and 1 percent salt by weight, amounts that mimic the fat and salt found in our pork roast. Then we formed the potatoes into two equal-size, oblong shapes on a baking sheet. Next we scraped three pork rib bones clean of all fat and connective tissue, so that the only flavor would be from the marrow, and placed these bones over the top of one of the "roasts." To create a control, we left the other mashed-potato "roast" alone. Then we cooked both of our imitation roasts in a 425-degree oven for 1 1/2 hours. After a 20-minute rest, we compared the plain sample to the one with bones.
RESULTS
A majority of tasters found that the sample cooked with bones tasted noticeably meaty.
EXPLANATION
As bones are heated, they expel moisture, salt, amino acids, and nucleotides (the last two being responsible for the "meatiness" that tasters detected) from the richly flavored marrow. However, since those water-soluble flavor molecules must penetrate through a thick layer of bone to reach the meat, the diffusion process is slow and the amount of flavor contributed is not enormous. Nevertheless, when coupled with the considerable moisture- and flavor-enhancing benefits of the fat, and connective tissue around the bones, the process certainly provides another good reason to opt for bone-in.
-
 BONE-IN MASHED POTATO "ROAST"
Crazy as it sounds, our imitation roast proved that some flavor from the bone can migrate into the meat.
Technique
==========================================================================
==========================================================================
-
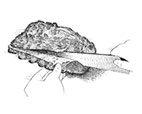
Carving Pork Roast, Bone-In and Bone-Out
Our Grill-Roasted Bone-In Pork Rib Roast can be served on the bone in thick slabs, or the meat can be removed from the bone and sliced into thinner pieces.
-
 FOR THICK BONE-IN CHOPS
Stand the roast on the carving board with the bones pointing up, and cut between the bones into separate chops.
-
 FOR THIN BONELESS SLICES
1. Holding the tip of the bones with one hand, use a sharp knife to cut along the rib to sever the meat from the bones.
-
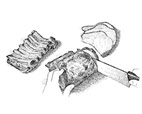 2. Set the meat cut side down on the carving board and slice across the grain into 1/2-inch-thick slices.
=======================================================================

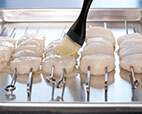
Grilled Scallops
Double-skewering the scallops makes flipping easier. To skewer, thread four to six scallops onto one skewer and then place a second skewer through the scallops parallel to and about ¼ inch from the first. You will need a deep (at least 2¾ inches) disposable 13 by 9-inch aluminum roasting pan. The technique used in step 2, which works well with metal grill grates, is not advisable for ceramic grill grates, as it has the potential to damage the grates.Ingredients
- 1 1/2pounds large dry sea scallops, 10 to 20 per pound, small side muscles removed
- 8 - 12 12-inch metal skewers
- Disposable 13- by 9-inch aluminum cake pan
- 2tablespoons vegetable oil, plus extra for cooking grate
- 1tablespoon unbleached all-purpose flour
- 1teaspoon cornstarch
- 1teaspoon sugar
- Kosher salt and ground black pepper
- Lemon wedges, for serving
- 1 recipe vinaigrette, optional (see related recipes)
Instructions
- 1. Place scallops on rimmed baking sheet
lined with clean kitchen towel. Place second clean kitchen towel on top
of scallops and press gently on towel to blot liquid. Let scallops sit
at room temperature, covered with towel, for 10 minutes. With scallops
on flat work surface, thread onto doubled skewers so that flat sides
will directly touch grill grate, 4 to 6 scallops per doubled skewer.
Return skewered scallops to towel-lined baking sheet; refrigerate,
covered with second towel, while preparing grill.
- 2a. FOR A CHARCOAL GRILL: Light
large chimney starter mounded with charcoal (7 quarts, about 120
briquettes). Meanwhile, poke twelve ½-inch holes in bottom of disposable
aluminum roasting pan and place in center of grill. When top coals are
partially covered with ash, pour coals into pan. Loosely cover cooking
grate with large piece of heavy-duty aluminum foil; set cooking grate in
place, cover, and heat grate until hot, about 5 minutes.
- 2b. FOR A GAS GRILL: Loosely
cover cooking grate with large piece of heavy-duty aluminum foil,
leaving 2-inch exposed border on each side of grate. Turn all burners to
high, cover, and heat grill until very hot, about 15 minutes.
- 3. Remove foil with tongs and discard. Clean
grate. Lightly dip wad of paper towels in oil; holding wad with tongs,
wipe grate, redipping towels in oil between applications, until grate is
black and glossy, 5 to 10 times.
- 4. While grill is heating, whisk oil, flour, cornstarch, and sugar together in small bowl. Remove towels from scallops. Brush both sides of skewered scallops with oil mixture and season with salt and pepper. Place skewered scallops directly over hot grate. Cook scallops with lid down over high heat without moving scallops until lightly browned, 2½ to 4 minutes. Carefully flip skewers and continue to cook until second side is browned, sides of scallops are firm, and centers are opaque, 2 to 4 minutes longer. Serve immediately with lemon wedges and vinaigrette (if using).
Technique
-
Grill Setup—Trial by Fire
Creating a good sear on scallops without overcooking them requires a quick blast of the hottest heat possible. Here's how we experimented with bringing the food and the fire closer together.
-
 WASTEFUL
Building a huge fire with two chimneys' worth of coals (12 quarts) worked well but was wasteful. -
 SILLY
SILLY
Laying the skewers on the rack set diretcly over the chimney required endless batch work. -
 RIGHT ON
An aluminum pan filled with 7 quarts of coals created a tall, super-hot, even fire in the center of the grill.
Technique
-
No-Stick Scallops
 Like
fish, scallops exude a protein that fuses with the metal grate when
they hit the grill bare. To create a barrier between the flesh and the
cooking surface, we lightly coat the scallops with a mixture of oil,
flour, and cornstarch, along with just a touch of sugar to promote
browning.
Like
fish, scallops exude a protein that fuses with the metal grate when
they hit the grill bare. To create a barrier between the flesh and the
cooking surface, we lightly coat the scallops with a mixture of oil,
flour, and cornstarch, along with just a touch of sugar to promote
browning.
======================================================================

Thai Grilled-Beef Salad
Serve with steamed jasmine rice, if desired, although any style of white rice can be used. Don't skip the toasted rice: It's integral to the texture and flavor of the dish. If a fresh Thai chile is unavailable, substitute half of a serrano chile.Ingredients
- 1teaspoon sweet paprika
- 1teaspoon cayenne pepper
- 1tablespoon white rice
- 3tablespoons lime juice (2 limes)
- 2tablespoons fish sauce
- 2tablespoons water
- 1/2teaspoon sugar
- 1 (1 1/2 pound) flank steak, trimmed
- Salt and white pepper, coarsely ground
- 4 shallots, sliced thin
- 1 1/2cups fresh mint leaves, torn
- 1 1/2cups fresh cilantro leaves
- 1 Thai chile, stemmed and sliced thin into rounds
- 1 seedless English cucumber, sliced 1/4 inch thick on bias
Instructions
- 1. Heat paprika and cayenne in 8-inch skillet over medium heat; cook, shaking pan, until fragrant, about 1 minute. Transfer to small bowl. Return now-empty skillet to medium-high heat, add rice, and toast, stirring frequently, until deep golden brown, about 5 minutes.
- Transfer to second small bowl and cool for 5 minutes. Grind rice with spice grinder, mini food processor, or mortar and pestle until it resembles fine meal, 10 to 30 seconds (you should have about 1 tablespoon rice powder).
- 2. Whisk lime juice, fish sauce, water, sugar, and 1/4 teaspoon toasted paprika mixture in large bowl and set aside.
- 3a. FOR A CHARCOAL GRILL: Open bottom vent completely. Light large chimney starter filled with charcoal briquettes (6 quarts). When top coals are partially covered with ash, pour evenly over half of grill. Set cooking grate in place, cover, and open lid vent completely. Heat grill until hot, about 5 minutes.
- 3b. FOR A GAS GRILL: Turn all burners to high, cover, and heat grill until hot, about 15 minutes. Leave primary burner on high and turn off other burner(s).
- 4. Clean and oil cooking grate. Season steak with salt and white pepper. Place steak over hot part of grill and cook until beginning to char and beads of moisture appear on outer edges of meat, 5 to 6 minutes. Flip steak and continue to cook on second side until charred and center registers 125 degrees, about 5 minutes longer. Transfer to plate, tent loosely with aluminum foil, and let rest for 5 to 10 minutes (or allow to cool to room temperature, about 1 hour).
- 5. Slice meat, against grain, on bias into 1/4-inch-thick slices. Transfer sliced steak to bowl with fish sauce mixture. Add shallots, mint, cilantro, chile, and half of rice powder; toss to combine. Transfer to platter lined with cucumber slices. Serve, passing remaining rice powder and toasted paprika mixture separately.
Technique
-
Five Tastes of Thai Grilled Beef—and One More
One of the keys to this salad is balancing the signature flavor elements of Thai cuisine. In addition to achieving this, we added one more complementary flavor: the earthiness of toasted cayenne and sweet paprika.
-
 HOT
HOT
A fresh Thai bird chile creates bright, fruity heat in the dressing. -
 SOUR
SOUR
A generous 3 tablespoons of fresh lime juice adds bracing acidity. -
 SALTY
SALTY
Derived from salted, ¬fermented fish, pungent fish sauce acts as a rich ¬flavor enhancer. -
 SWEET
SWEET
A half teaspoon of sugar tames the dressing’s salty-sour flavors without becoming cloying. -
 BITTER
Thoroughly charred steak adds both a pleasing ¬textural contrast and a subtle bitter edge. -
 EARTHY
Though nontraditional, ground cayenne and sweet paprika add earthy flavor without too much heat.
Technique
-
Unbeadable Thai Trick: Knowing When to Flip
This salad’s Thai name, nam tok (literally “water falling”), refers to the beads of moisture that form on the surface of the steak as it cooks—an age-old Thai cookery clue that the meat is ready to be flipped. While this method sounded imprecise, during testing I found it to be a surprisingly accurate gauge of when the flank steak is halfway done. Here’s why: As this steak’s interior gets hotter, its tightly packed fibers contract and release some of their interior moisture, which the fire’s heat then pushes to the meat’s surface. When turned at this point and cooked for an equal amount of time on the second side, the steak emerged deeply charred on the outside and medium-rare within. (Note: We do not recommend this technique across the board for steaks; since the thickness and density of the meat fibers vary from cut to cut, the time it takes for heat to penetrate and for beads of moisture to be pushed to the meat’s surface differs.)
-
 TIME TO FLIP
For perfectly cooked meat, flip the steak when beads of moisture appear on its surface.
==========================================================================
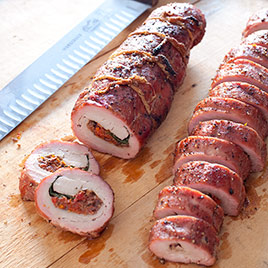
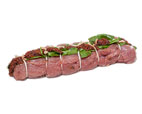
Grilled Stuffed Pork Tenderloin
Ingredients
- 4teaspoons packed dark brown sugar
- 2 1/4teaspoons kosher salt
- 1 1/4teaspoons pepper
- 2 (1 1/4 to 1 1/2-pound) pork tenderloins, trimmed
- 1 recipe stuffing (see related recipes)
- 1cup baby spinach
- 2tablespoons olive oil
Instructions
- 1. Combine sugar, 2 teaspoons salt, and 1 teaspoon pepper in bowl. Cut each tenderloin in half horizontally, stopping 1/2 inch away from edge so halves remain attached. Open up tenderloins, cover with plastic wrap, and pound to 1/4-inch thickness. Trim any ragged edges to create rough rectangle about 10 inches by 6 inches. Sprinkle interior of each tenderloin with 1/8 teaspoon salt and 1/8 teaspoon pepper.
- 2. With long side of pork facing you, spread half of stuffing mixture over bottom half of one tenderloin followed by 1/2 cup spinach. Roll away from you into tight cylinder, taking care not to squeeze stuffing out ends. Position tenderloin seam side down, evenly space 5 pieces twine underneath, and tie. Repeat with remaining tenderloin, stuffing, and spinach.
- 3a. FOR A CHARCOAL GRILL: Light large chimney starter filled with charcoal briquettes (6 quarts). When top coals are partially covered with ash, pour evenly over half of grill. Set cooking grate in place, cover, and heat grill until hot, about 5 minutes.
- 3b. FOR A GAS GRILL: Turn all burners to high, cover, and heat grill until hot, about 15 minutes. Leave primary burner on high and turn off other burner(s).
- 4. Clean and oil cooking grate. Coat pork with oil, then rub entire surface with brown sugar mixture. Place pork on cooler side of grill, cover, and cook until center of stuffing registers 140 degrees, 25 to 30 minutes, rotating pork once halfway through cooking.
- 5. Transfer pork to carving board, tent loosely with foil, and let rest for 5 to 10 minutes. Remove twine, slice pork into 1/2-inch-thick slices, and serve.
Technique
-
The RIght (and Wrong) Way to Stuff Pork Tenderloin
The trick to keeping the stuffing intact depends on how you butcher and bind the roast.
-
 Coming Unhinged
Butterflying the roast and simply folding the hinged flaps of meat around the stuffing can lead to oozing filling. -
 Pounded and Rolled
Pounding the butterflied roast before stuffing allows the meat to be tightly rolled, not folded around the filling.
==========================================================================
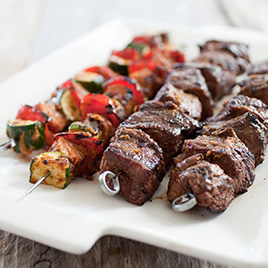
Beef Kebabs
To ensure evenly sized chunks, we prefer to
purchase whole steak tips (sometimes labeled “flap meat”) and cut them
ourselves. However, if you have long, thin pieces of meat, roll or fold
them into approximate 2-inch cubes before skewering. (For more
information, see related How-to-Cook.) Two and one-half pounds of blade
steak can be substituted for the flap meat; if using, cut the steak in
half and remove the gristle that runs through it. You will need four
12-inch metal skewers for this recipe. Our preferred brand of beef broth
is Rachael Ray Stock-in-a-Box All-Natural Beef Flavored Stock.
Ingredients
Marinade
- 1 medium onion, roughly chopped
- 6 medium garlic cloves, roughly chopped
- 2teaspoons finely grated zest
- 2tablespoons chopped fresh rosemary
- 1/3cup beef broth
- 1/3cup vegetable oil, plus extra for cooking grate
- 3tablespoons tomato paste
- 2teaspoons table salt
- 1 1/2teaspoons sugar
- 3/4teaspoon ground black pepper
Beef and Vegetables
- 2pounds sirloin steak tips, trimmed of excess fat and cut into 2-inch chunks (see note)
- 1 large zucchini or summer squash (about 1/2 pound), ends trimmed, halved lengthwise, and cut crosswise into 1-inch-thick slices
- 1 large red or green bell pepper, stemmed, seeded, and cut into 1 1/2-inch pieces
- 1 large red or sweet onion, ends trimmed, peeled, halved lengthwise, core discarded, each half cut into 4 wedges and each wedge cut crosswise into thirds
Instructions
- 1. FOR THE MARINADE: Place
all ingredients in blender and process until smooth, about 45 seconds.
Transfer ¾ cup marinade to large bowl and set aside.
- 2. FOR THE BEEF AND VEGETABLES:
Toss remaining marinade and beef in second large bowl. Cover with
plastic wrap and refrigerate 1 hour or up to 2 hours, tossing beef after
30 -minutes. Meanwhile, prepare vegetables and toss with reserved
marinade. Cover and let vegetables marinate at room temperature at least
30 minutes.
- 3. Remove beef from marinade and pat dry with
paper towels. Tightly thread beef onto two 12-inch metal skewers,
rolling or folding meat as necessary to maintain 2-inch cubes. Thread
vegetables onto two 12-inch metal skewers, in alternating pattern of
zucchini, pepper, and onion.
- 4a. FOR A CHARCOAL GRILL: About
30 minutes before grilling, light large chimney starter mounded over
rim with charcoal (7 quarts, about 120 briquettes). When top coals are
partially covered with ash, arrange all coals in center of grill in even
layer, leaving 2-inch gap between grill wall and charcoal. Set cooking
grate over coals, cover, and heat grate until hot, about 5 minutes.
- 4b. FOR A GAS GRILL: Turn all burners to high, cover, and heat grill until hot, about 15 minutes.
- 5. Place meat skewers in center of grill directly over coals and vegetable skewers near edge of coals but still over fire. Grill beef skewers until well browned, slightly charred, and instant-read thermometer inserted into center of meat registers 125 degrees for medium-rare, 12 to 16 minutes, turning every 3 to 4 minutes. Transfer beef skewers to serving platter, loosely tent with foil, and let rest 10 minutes. Continue to grill vegetable skewers until vegetables are tender and slightly charred, about 5 minutes longer (17 to 21 minutes total), turning every 4 to 5 minutes. Transfer vegetables to platter with beef. Remove beef and vegetables from skewers and serve.
No comments:
Post a Comment